OiRA tools generator User Manual
This User Manual is also available to download on:
Note: the images in this User Manual are generally more legible in printed form (preferably in colour) than on the screen.
General
Requesting a Login Account
To request a Login Account, send an email to OiRA Support (oira@osha.europa.eu) with the following information:
- The name of your sector (as known by the general public).
- Your fore- and surname.
- Your email address.
- Your preferred password for the OiRA tools generator (with a minimum of 5 characters, the user name will be confirmed by the EU-OSHA OiRA Team)
- The name of your sector (as known by the general public) and NACE code
In addition, clearly state in your email that you are requesting an account for the OiRA Tool, and explain why.
We will use this information to create your sector and will link this your Login Account.
Once your account has been created you will receive an email, at the provided address, containing the login information. Please note: Both your user name and password are case sensitive!
In addition to the login information you will receive an agreement, which determines the Terms and Conditions for using the OiRA tools generator (such as: full public access, responsibility to keep the sector’s OiRA tool up-to-date). The agreement has to be signed and returned within three weeks.
Logging in
Preferred web browsers are: Mozilla Firefox version 3.6, or any later version, or Google Chrome (both are available to download for free). Alternatively Microsoft Internet Explorer version 7, or any later version.
You start on: http://admin.oiraproject.eu/
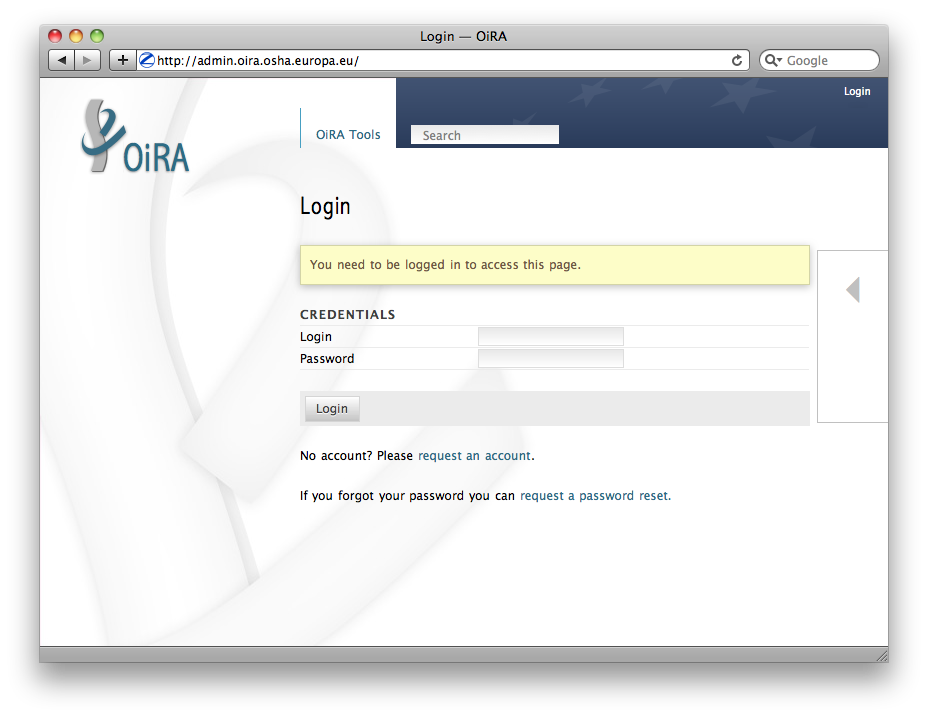
And login with your User Name and Password. Did you forget your password? Check the confirmation email or click at the bottom of the page on ‘request a password reset’. Then add your user name and click on ‘Send’.
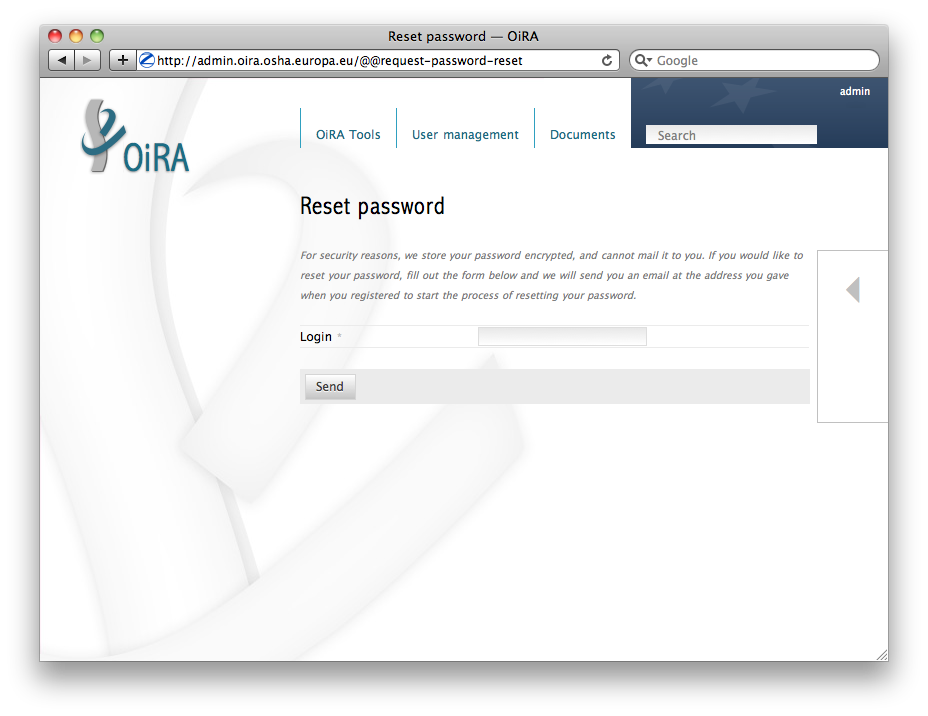
The password will be sent to the email address you provided.
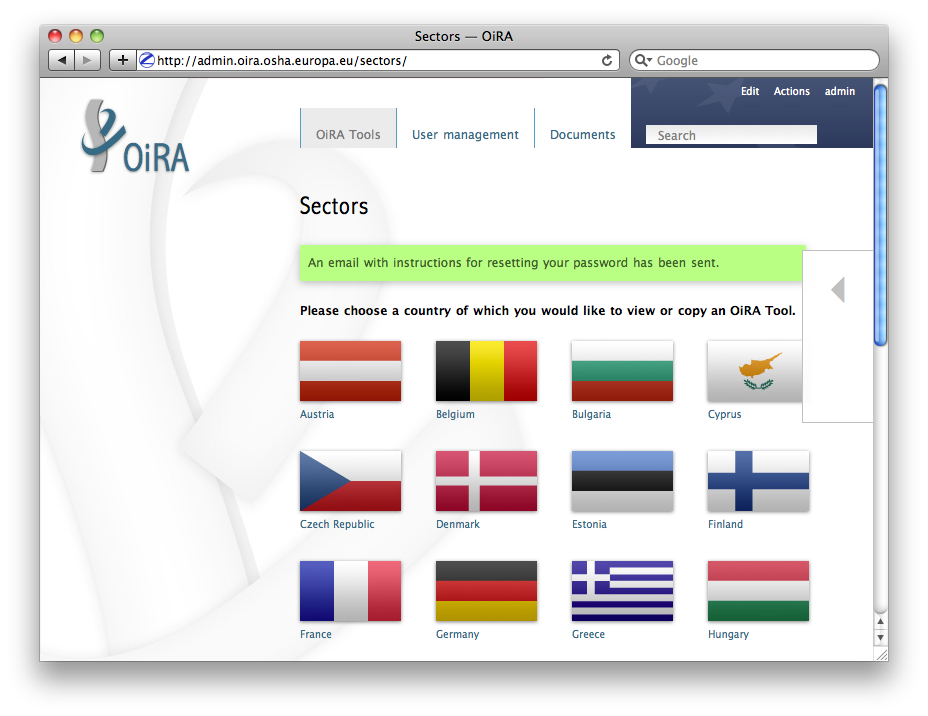
If your login has been successful, a green bar with a confirmation will appear.
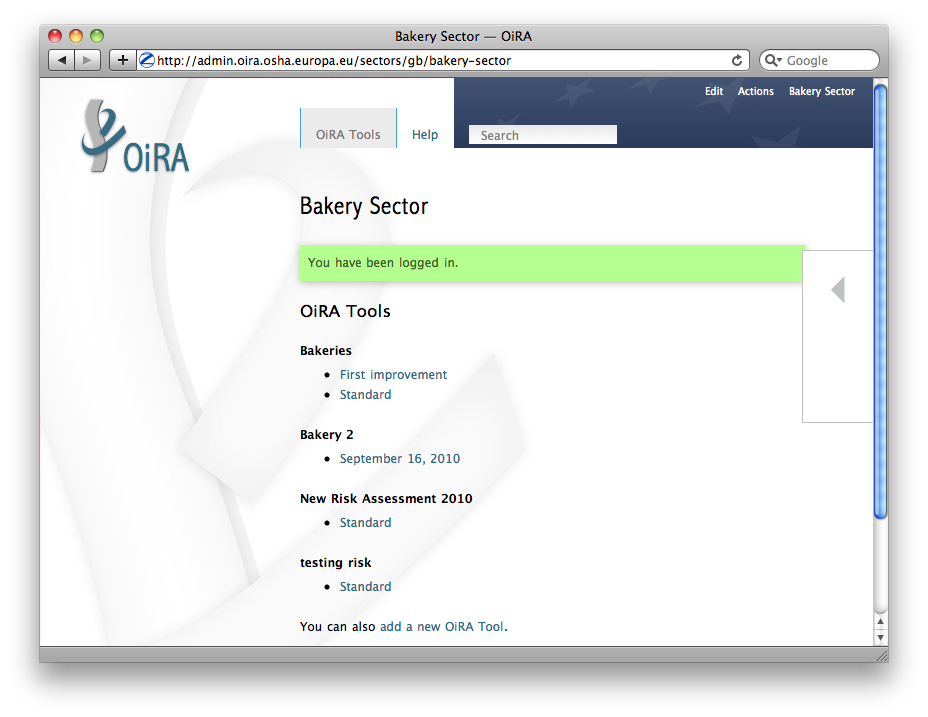
After logging in, you will be brought to a page with an overview of the Risk Assessment Tool for your sector. Here you can: click on a tool to amend it, or start a new OiRA tool by clicking on –> ‘Add New OiRA tool’ at the bottom of the page.
Logging out
Don’t forget to logout when you stop working in the OiRA tools generator. This is done with the button at the top right: click on your login name and select ‘Logout’. After logging out successfully, you will be brought back to the login screen where you will see the notification ‘Logout successful’.
Creating a new OiRA tool
After clicking on ‘Add New OiRA tool’ you will be brought to the page below:
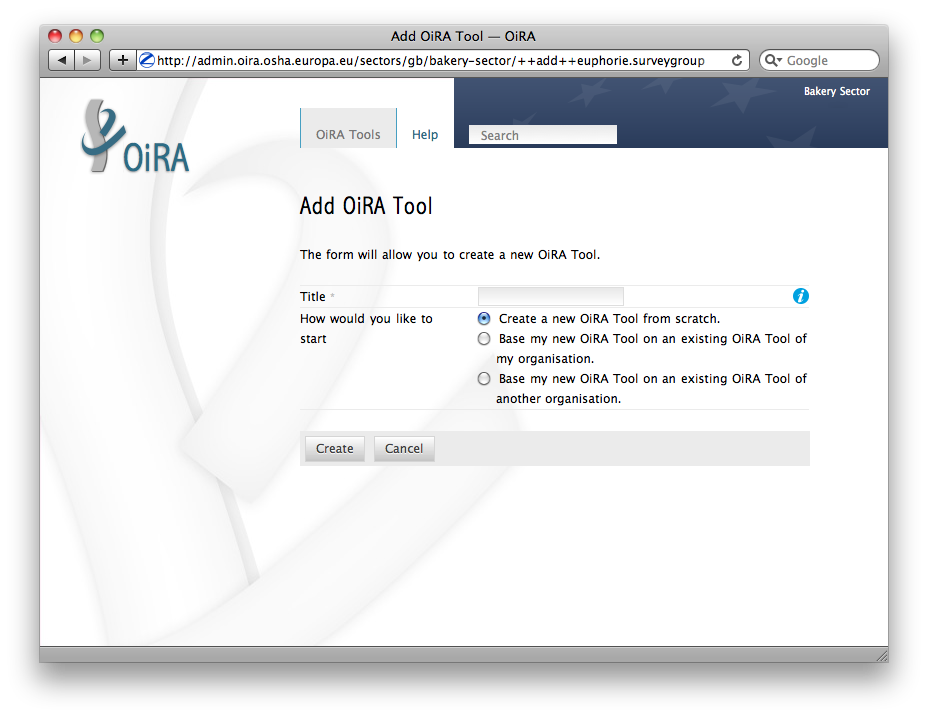
When creating a new OiRA tool you can choose from the following three options:
- Start with a blank OiRA tool
- Base my OiRA tool on an existing OiRA tool of my organisation.
- Base my OiRA tool on an existing OiRA tool of another organisation.
Ad 1) Starting with a blank OiRA tool is particularly useful when you already have a paper-based OiRA tool for your organisation and would like to transfer this to the digital system.
Ad 2) This option is recommended when you are: (a) planning to revise the contents of your OiRA tool and/or (b) would like to add new modules. This option is also useful for organisations which manage multiple (sector-)OiRA tools, of which the base modules are applicable to other OiRA tools.
Note
When dealing with minor amendments, e.g. typos, it would be best to implement these in the existing OiRA tool and simply republish it.
Note
When the risks won’t be amended, but, for instance, only the clarifications you can simply create a new version (a copy) of the existing OiRA tool.
Ad 3) You can decide which existing OiRA tool is most suitable for your sector. You can copy and modify it, and thus avoid having to create one from scratch. You have to determine the amendments for your own sector. For example, the butcher could copy and modify the OiRA tool of the fish retailer.
In addition to the OiRA tool of a specific sector, you can also use the so-called generic checklist as a starting point. It’s slightly more general, but it does contain all the relevant aspects for an OiRA tool. The base-OiRA tool has been an inspiration for many sector-specific Digital OiRA tools and is considered to be a suitable starting point.
Note
THE BASE-OiRA TOOL WILL BE AVAILABLE IN THE FUTURE
The base-OiRA tool provides solutions at module level, which you can copy and modify if needed. It doesn’t provide solutions at a risk level. In addition, most modules of the base-OiRA tool start with a ‘filter question’, which determines whether the situation concerned will be applicable to the end-user.
Note
After you’ve copied an existing OiRA tool, any changes made to the ‘source-OiRA tool’ will not automatically be reflected in your own OiRA tool. When, for example, the butcher has copied the OiRA tool of the fish retailer and the fish retailer implements changes in their OiRA tool afterwards, these changes will not appear in the OiRA tool of the butcher.
If you would like to copy the OiRA tool of another sector as a starting point, you need to first select the country in the drop-down menu and subsequently the sector of your choice.
When this sector provides more than one version, you can view these versions and select one.
Give the OiRA tool a name (title). This name will be shown to the end-user in the overview. Tip: The overview is in alphabetical order, so make sure to choose a name based on your sector, for example ‘New Risk Assessment 2010’.
Then click on ‘Save Changes’ at the bottom of the page.
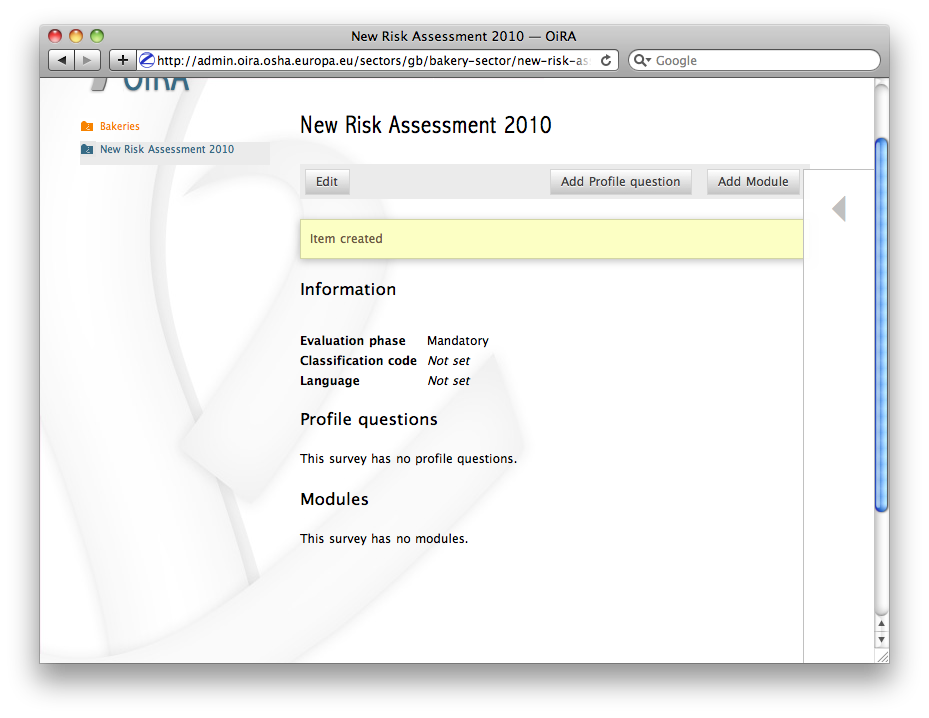
Your OiRA tool will then be created. Please note that this can take a while if you’ve chosen to use a copy of an existing OiRA tool.
In case of a new (blank) OiRA tool you will see a screen as shown below:
Editing an OiRA tool
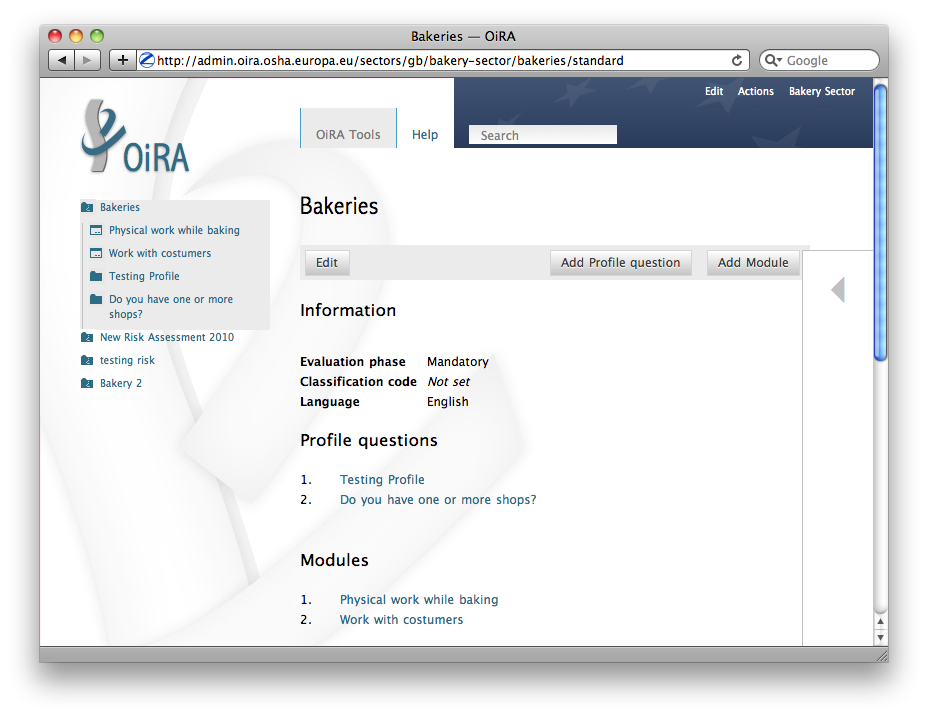
On the main page (top navigation tree) you indicate those things, that are of priority for the OiRA tool as a whole. You can modify these later, by clicking on ‘Edit’:
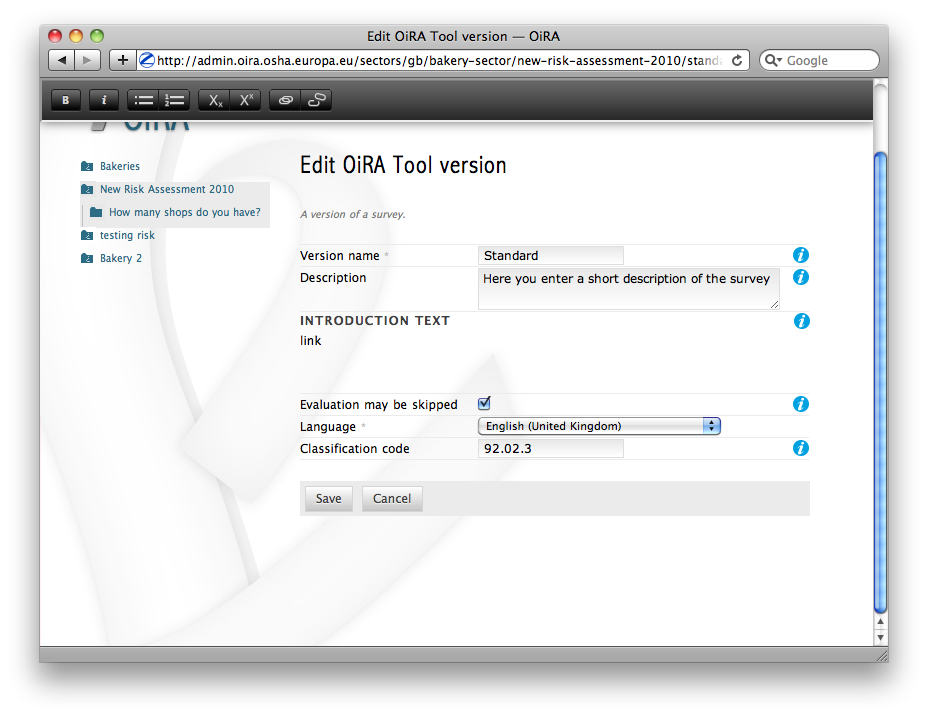
Name: you can modify the name of the OiRA tool. The name you enter here will not be visible to the end-user and is mainly intended to facilitate you in managing the version. For the first version (new OiRA tool) the name ‘Standard’ will automatically be selected.
Description: short content description.
Introduction: Please provide some relevant and encouraging information for end-users of the OiRA tool:
- The importance of risk assessment
- The fact that risk assessment is not necessarily something complicated (the idea is to demystify risk assessment)
- The fact that the tool has especially been conceived to meet the needs of the enterprises of the sector. It is important to specify here precisely which end-users are expected to use the tool (who is the end-user of the tool).
Please adapt this text according to your sector needs, but try to keep it short.
You can add a hyperlink to a page/file containing the questionnaire for employees as an input for the assessment if social partners in your sector have decided that this is important.
You can insert hyperlinks
The evaluation can be skipped: If this option is selected, users are not obliged to fill in the evaluation phase.
Language: choose the language of the OiRA tool in the drop-down menu.
Classification Code: we plan to show the sector codes for all of Europe here in the near future (according to the NACE-standard). For now you can write the name of your sector.
Note
If you edit an OiRA Tool, you are in fact editing one of its versions. If you haven’t added any versions yet, you are still editing the “standard” version, which was added for you automatically. If you want to change title or description of the version container, you currently have to call its edit form directly like this: http://admin.oiraproject.eu/sectors/gb/bakery-sector/new-risk-assessment-2010/edit
Warning
Once a tool has been published, you cannot rename it anymore.
In the larger fields you can add both normal and formatted text. You will be able to identify this option from the grey bar at the top of the page (the ‘formatting bar’). The formatting bar will only be visible when you’re in a field where formatting is possible.
We would recommend you to type the text into the field without formatting. When you paste text into the field from another program, e.g. Word, the font used in Word will automatically be copied over. You will then not be able to change the font with the formatting bar. Word generates code to convert the text to html (which is used in the OiRA tools generator).You will not see this code when you paste the text from Word into the OiRA tools generator, but it does exist ‘underneath’ the text. Hyperlinks also have a fixed format in Word (colour and underlining), which is unchangeable after pasting into the OiRA tools generator. It’s best to implement hyperlinks after the text has been entered correctly into the OiRA tools generator (see the explanation further below for creating links).
Therefore, please keep in mind that pasting text from Word can cause unexpected effects. In addition, pasting text from programs other than Word can cause similar unexpected effects. This applies to all fields in the OiRA tools generator where formatting is possible. This is why we advise you to type the text into the field without formatting, instead of pasting from Word. When you do decide to paste from Word, it’s best to ensure that all the text is already formatted correctly (font, size and colour). In addition, all text you paste in should ideally have consistent font, size and colour properties.
The formatting bar offers the following options:
Bold (fat): you select (by dragging the mouse) a portion of text and click on ‘B’ in the formatting bar above the field.
Selecting the same text again and re-clicking ‘B’ will undo the bold font (this applies to all formatting options).
Italic (italicized): you select (by dragging the mouse) a portion of text and click on the ‘I’ in the formatting bar above the field. NB: Italicized text is generally not very legible on a screen.
Bullet points: you select the required lines and click on the icon with the dots.
Numbered list: you select the required lines and click on the icon with ‘1-2’.
Hyperlink (to a website): first type the text on which you would like to apply the hyperlink, for example: ‘Also see this website’. Subsequently you select the text (by dragging the mouse). You then click on the button with the chain icon in the formatting bar. A new screen will then open:
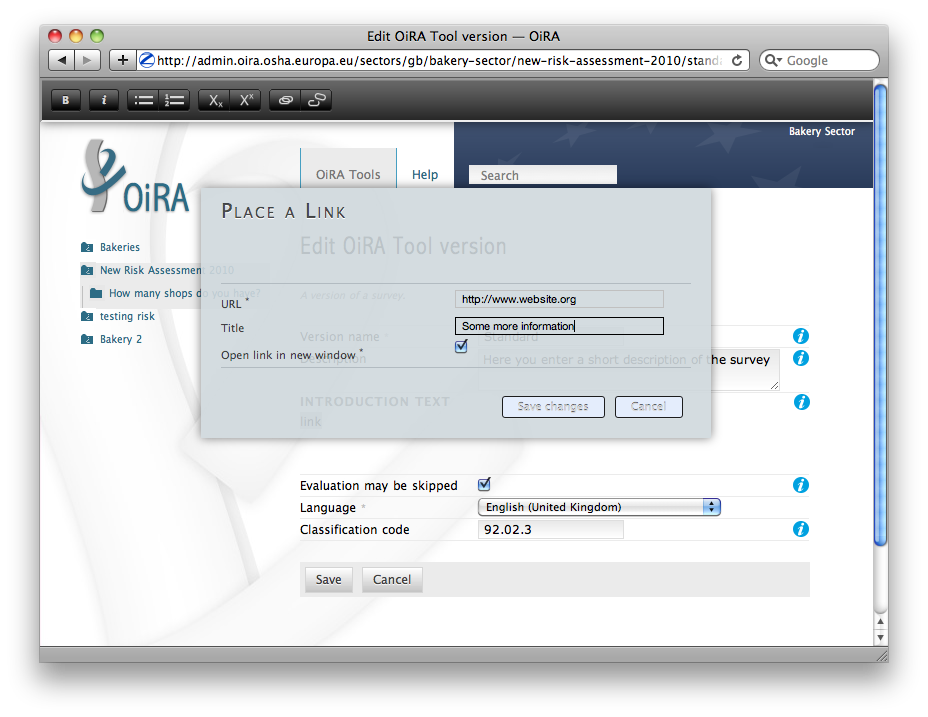
At ‘URL’ you enter the web address, this must start with:
http://. Subsequently, you enter a title and indicate whether the link should open in a new screen by selecting the box. Then click on ‘Save’. The link will appear as underlined text. Modify the link:: double click on the link. Delete the link: delete the linked word and retype it.Note
URLs are the way to link to documents from the sector, which you want to add to the OiRA tool. For example: concept plans, concept drafts, etc. Simply place the documents onto a website and create a hyperlink to the site in the OiRA tool.
If you would like to offer actual documents (e.g. Word or PDF files) on your OiRA tool, you first have to place the documents onto a website (e.g. the site of your sector’s organisation) and then create a link to these files as described above.
With ‘Ctrl-z’ you can undo formatting and textual changes you made in the OiRA tools generator field (multiple changes can be undone, as long as you haven’t clicked ‘Save’).
In addition, you can click the right button of your mouse when you are in a field, which will provide you with an applicable menu. When you select a word you will also see options such as: cut, copy, paste, etc.
Alternatively, you can use the following keyboard shortcuts:
- Copy: Ctrl-c.
- Paste: Ctrl-v.
- Cut: Ctrl-x.
- Select all: Ctrl-a.
- Undo: Ctrl-z.
- Search (within the field): Ctrl-f.
Click the ‘Save’ button (at the bottom) when you’re finished, this will take you back to the last screen. A yellow bar at the top will confirm that the item has been modified, which means that the information has been saved.
The functions described above apply to all fields in the entire OiRA tools generator where formatting is possible.
Creating the structure of an OiRA tool
When completing/modifying the content it’s essential to first consider which structure you will give your OiRA tool. With structure we mean: which main modules and/or submodules with risks will there be?
The OiRA tool can contain main modules and submodules. ‘Sub-submodules’ are not possible.
Within a module you can either add submodules or risks, a combination of both isn’t possible. You can however add risks to a submodule.
When you base the OiRA tool on an existing OiRA tool, it will already have a structure. Main modules and/or submodules can be added to, or removed from this structure. You can also copy and move modules, both within the OiRA tool and to other OiRA tools under your management (see the overview on the left).
Click on the module/risk which you want to copy or move, and open the menu ‘Actions’ (top right). Choose the desired option, go to the area where you want to move it (click in the desired OiRA tool and folder) and choose ‘Paste’ in the Action menu.
How can you determine the structure?
When using an existing OiRA tool as a starting point, you should study the structure and adjust it where required.
For example, the structure of a base-OiRA tool consisting of modules and sub modules is as follows:
- The building
- Every building
- Specific buildings
- Storage room / warehouse
- Type of work
- Office work
- Delivery and removal of material
- Physical work
- Working on site
- Working with customers / clients / guests
- Special circumstances
- Noise
- Climate: heat, radiation, cold, outdoors
- Vibrations
- Hazardours substances as raw material.
- Hazardours substances as a result / during work.
- Heights / crawl spaces / closed spaces.
- Tools / machines / means of transport.
- In case of emergencies
- Working and resting times
- Tasks / functions of workers
- Unwanted behaviour of colleagues
- General information
- Accidents
- Organisation of preventive measures. Prevention duties.
In the base-OiRA tool it’s easy to add main modules to the OiRA tools generator (half way through or at the end) or to create more submodules under existing main modules.
It’s also easy to delete main modules through the Action menu (top right) or move them up or down by dragging them.
It’s worth noting that in practice most sectors mainly expand and/or further specify the sections: ‘Type of Work’ (module 2), ‘Special circumstances’ (module 3) and occasionally ‘The Building’ (module 1), when modifying the basic OiRA tool.
Now you can complete the OiRA tool with modules, submodules, risks and measures (solutions).
In short the structure could look like this:
Main page OiRA tool
Profiling
- ‘Optional’ profile module (Do you have a store?)
- ‘Repeatable’ profile module (Name each store you have)
Modules
- ‘Optional’ module (filter question: Do you use dangerous substances?)
- ‘Mandatory’ module (must be filled in)
- Submodules
- Risks
- Measures (solutions)
Note
Terms used in the above example will be further clarified in the following chapters.
Using Profile questions
What are profile questions?
It is possible to skip or repeat modules in case they do not apply to the activity of the end user (optional profile question) or they apply to multiple objects (repeatable profile question).
Such questions are asked before starting the risk identification and evaluation. If the end-user does not tick the optional profile questions or does not add multiple objects, the related modules and risks are not displayed.
When determining which main modules and potential submodules should be created, it’s important to consider the option of using a so-called profile, a profile question is asked before one starts the OiRA tool. It is used to determine the main sections, activities, etc. of the company.
For example, for the bakery owner:
- Do you have a store?
- Do you have a stall at the market?
- Do you own a sales truck?
When the end-user answers with ‘Yes’, the submodules/risks are activated. The answer ‘No’ does not activate the submodules/risks. Imagine this to be the same as if you would include or exclude a certain part of a checklist, because it applies or does not apply to your situation.
Apart from this, the end-user will be required to complete a certain number of obligatory modules.
If you use a repeatable profile question, it will be possible for the end-user to indicate ownership of more than one object (e.g. multiple stores, stalls, sales trucks). Instead of putting a question, you would ask the user to name each object (“Name your bakery locations”) and the user will name the objects with names relevant to him (e.g. city center bakery, bakery head quarters, bakery city park). Through this, the modules associated with this repeatable profile will get repeated in the tool - once for each object. Imagine this to be the same as if you would make paper copies of a certain part of a checklist, because it needs to be filled for each location’s characteristics.
Using a profile is particularly useful in sectors, where it’s probable that a substantial number of modules with risks aren’t relevant to all companies. If you expect that most companies will complete practically all modules, creating a profile will be unnecessary unless you would like to have the possibility of completing part of the modules multiple times (as in the example with the multiple stores).
When someone replies with ‘No’ to an optional profile question, all subsequent risks will be nullified (when you don’t own a market stall, these risks won’t be shown). If someone replies with ‘Yes’, then all the applicable risks will be shown.
This module can thus be further completed as a normal module.
Adding profile questions
You can create profile questions as follows: click on the top level of the OiRA tool (top link in the navigation tree on the left-hand side) and in the grey bar underneath the title you will find the button ‘Add Profile Question’.
You will see the following page:
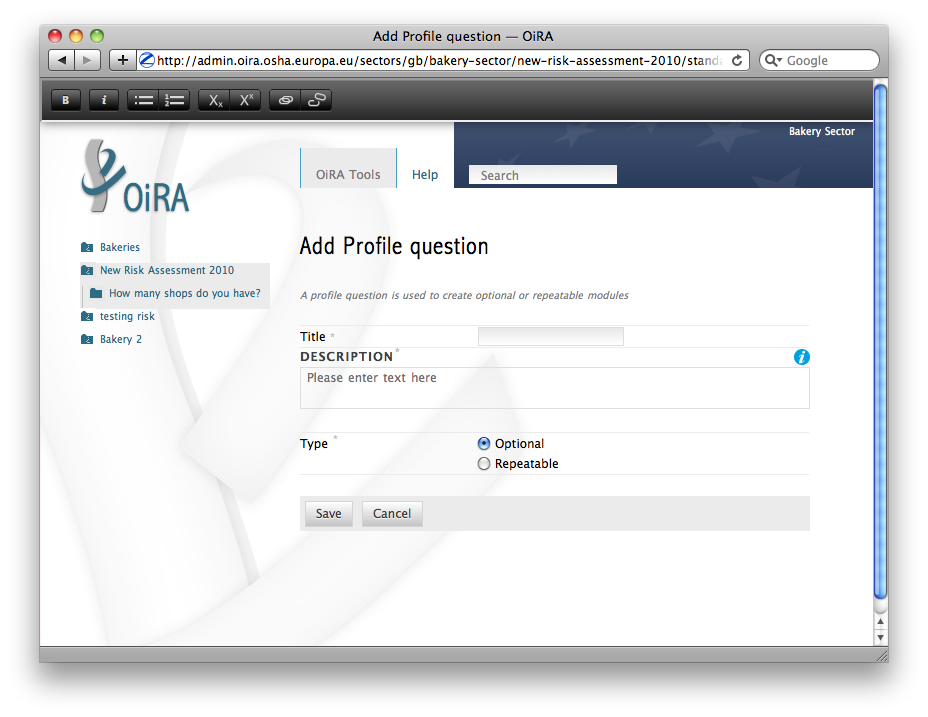
Here you can add:
Title: the title of this module, for instance ‘Working Circumstances’, ‘Acquisition’ or ‘Physical Strain’, etc. The end-user will see this title at the top of the page for the duration of answering this module’s risks. Don’t put a full stop after the title. A number isn’t needed either, the module will be numbered automatically.
Description: a short description of this module.
Type:
- optional: when you would like this module to start with a filter question.
- repeatable: when you would like to offer this module multiple times (e.g. per object).
The profile question acts as a module. You now have to add submodules and risks to it. You can do that by clicking the “Add Risk” or the “Add Module” button on the profile question object.

You can modify the modules at a later stage by using the ‘Edit’ button. With the Action menu (top right) you can cut, copy and delete modules and by dragging them (up or down) you can change their sequence.
Using the ‘optional’ feature in modules
Instead of determining which modules apply to the end-user through asking profile questions, there’s also the possibility of initially offering all modules. The first question of a module will then be, if this module is applicable to the end-user. We do this by asking a ‘filter statement’ expressed in a positive way, for instance a statement such as: ‘Dangerous substances are used’. As such, the end-user will initially deal with the module ‘Dangerous substances’, If the user answers with ‘No’ to this statement he will skip the whole module and potential sub-modules. It isn’t possible to skip risks by answering ‘Yes’ to a filter question, only by answering ‘No’.
If a filter question in a main module is answered with ‘No’, any potential submodules will also be skipped. It’s also possible to start submodules with a filter question. A combination of a main module with a filter question and related submodules with further filter questions (‘nested filter questions’), is possible.
Filter questions are not allowed to refer to potential risk, they only determine whether something is applicable or not.
Only one filter question may be used in a (sub)module. This is always the first question of the module. When there is a necessity to ask a ‘double filter question’, it’s best solved by amalgamating the two questions and adding an explanation of what happens when one answers with ‘Yes’ or ‘No’.
Example: ‘Physically demanding activities occur AND the prevention programme for physical strain has not yet been fully implemented.’
Answer with ‘Yes’ when physically demanding activities occur AND the prevention programme for physical strain has not yet been fully implemented. Otherwise answer with ‘No’.
It’s useful to start determining which modules could or should start with a filter question during the preparation of the module structure.
Creating modules, risks and measures
When the module structure is clear and the decision has been made whether a profile will be used or not, it’s a good idea to first completely implement the module structure into the OiRA tools generator. Only after that should you add the risks to the modules. It’s not useful to start adding risks to modules when the structure has not yet been determined.
Add Modules
You can create modules as follows: click on the top level of the OiRA tool (top link in the navigation tree on the left-hand side) and in the grey bar underneath the title you will find the button ‘Add Module’.
For a module you will see the following page:
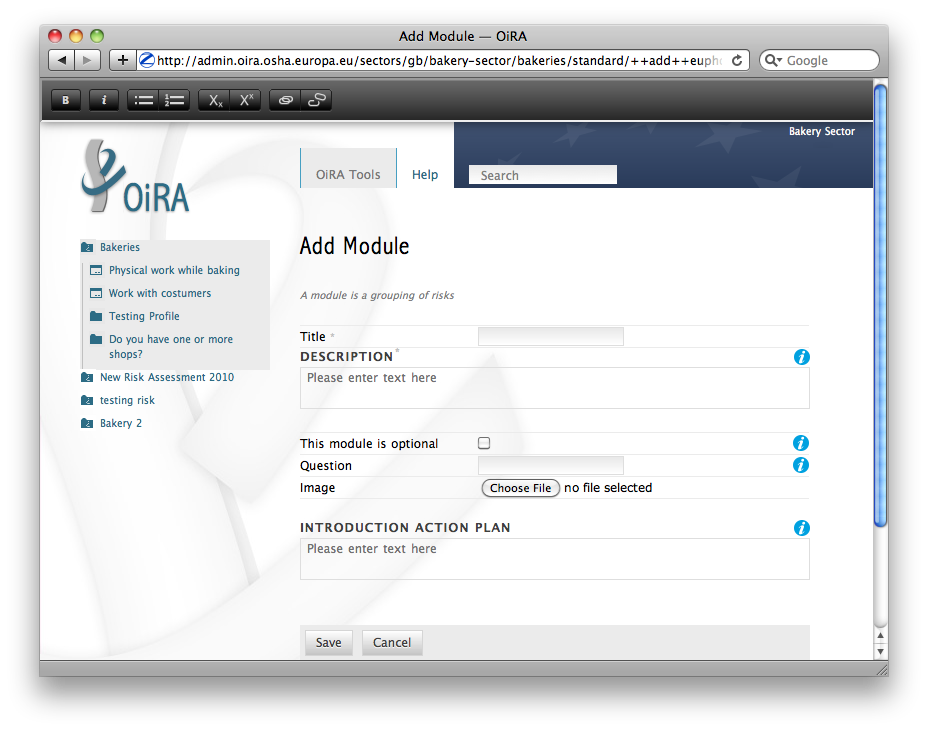
Here you can add:
- Title:
- The title of this module, for instance ‘Storage room’, ‘Working at height’ or ‘Physical Work’, etc. The end-user will see this title at the top of the page for the duration of answering this module’s risks. Don’t put a full stop after the title. A number isn’t needed either, the module will be numbered automatically. Keep it short and simple. Use everyday language and make sure end-user will immediately understand it.
- Description:
- Provide a short general description of the content of the module. You can create links to useful external pages providing additional relevant information.
- This module is optional:
- Choose if you want to force the end-user to go through this module and the related risks or if the module can be skipped, as not every company in the sector has the same activities.
- Question:
- If you have decided to make the module optional, you have to enter a question to ask the end-user if the activity is carried out in the enterprise. The answer has to be YES or NO. If NO is answered, the end-user will skip the module.
- Image:
- You can add an image.
- Overview of solution:
- At this level (module), in most of the cases only generic/orientative solutions can be provided. Here it is important to stress the importance of avoiding the risk, substituting the dangerous by the non-(or less) dangerous, combating risk at source. The solution can underline or focus on different aspects: technical and/or organisational, ... This text will appear in the action plan step. This overview of solution at module level is compatible/complementary with the measure(s) proposed at risk level.
Click on ‘Save’ at the bottom of the screen.
To add more main modules, again click on the top link in the navigation tree and select the button ‘New Module’.
To add a submodule to the current module, click on the module to which you want to add a submodule and select ‘Add Submodule’.
You can modify the modules at a later stage by using the ‘Edit’ button. With the Action menu (top right) you can cut, copy and delete modules and by dragging them (up or down) you can change their sequence.
Add Risks
A risk is always placed inside a module or submodule. You first select the required module on the left-hand side. Don’t add risks in the top level of the OiRA tool, only in the modules or submodules underneath.
Open the required module and click on ‘Add Risk’ in the grey bar underneath the title.
You will then see the screen below:
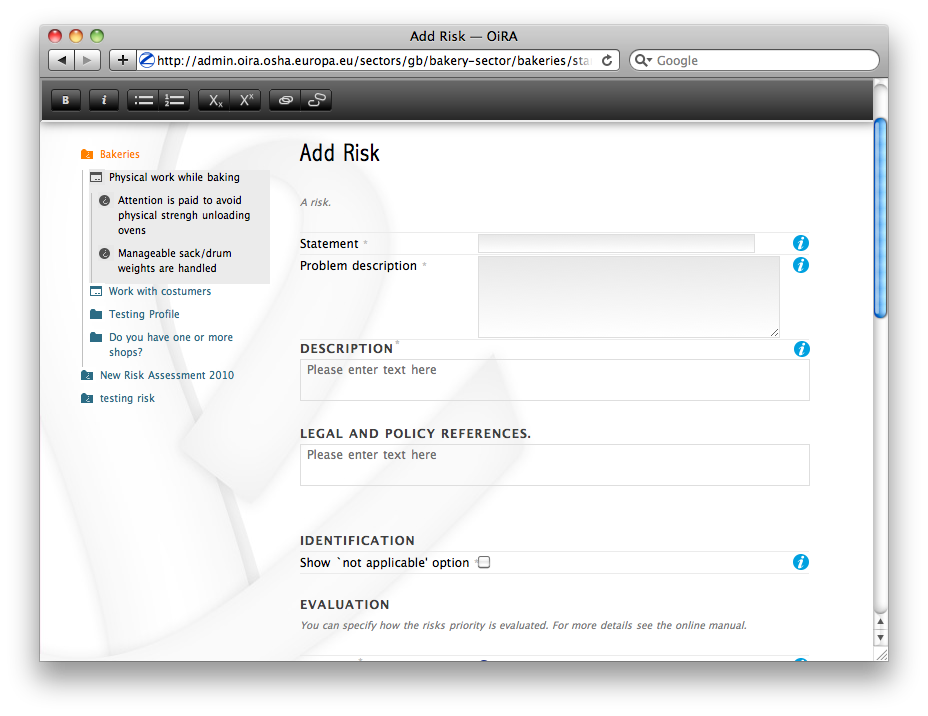
- Statement:
- Write a short positive statement about a possible risk For example: ‘There are no obstacles or trailing cables on the floors’. Put a full stop after the statement. For more information on how to properly formulate risk statements, see below.
- Problem description:
- This is the inverse of the statement = a negative statement This field is mandatory as the negative statement will appear in the risk evaluation and action plan steps (if the end-user answers NO to the positive statement). For example: ‘There are obstacles or trailing cables on the floors’.
- Description:
- Describe the risk and provide the end-user with any relevant information. You can create links to useful external pages providing additional relevant information. For example, put a clarification/explanation of the exact meaning of ‘timely inspection’
- Legal and Policy References:
- Provide relevant legal information related to the risk/topic/issue. You can create links to useful external pages providing additional relevant information.
- Identification Phase:
- If checked, this offers to the user the possibility to answer with ‘Not Applicable’ in addition to the usual Yes/No in the Identification phase.
- Evaluation Phase:
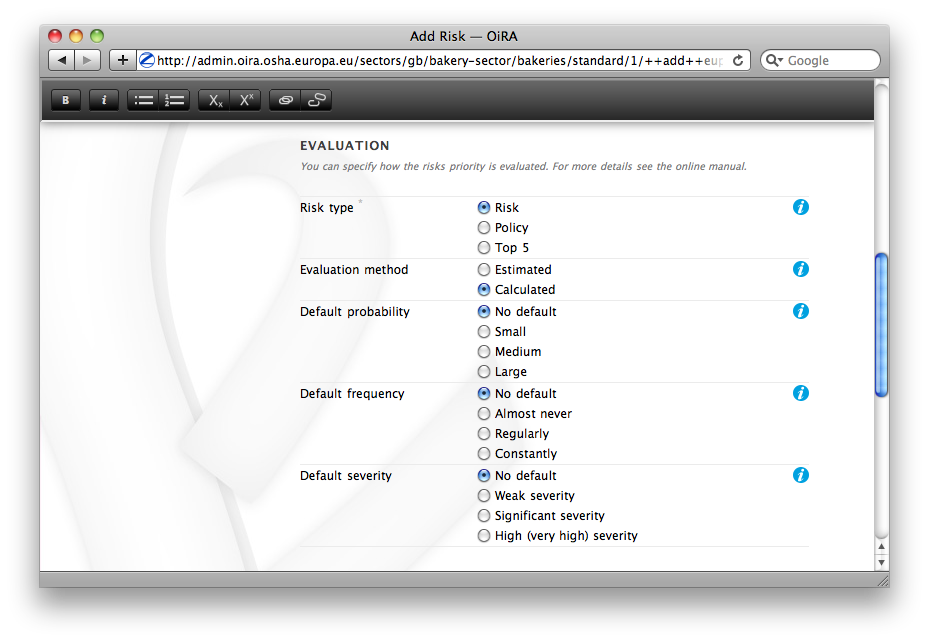
- Specify the risk type and the evaluation method. For more information on risk types and evaluation, see below.
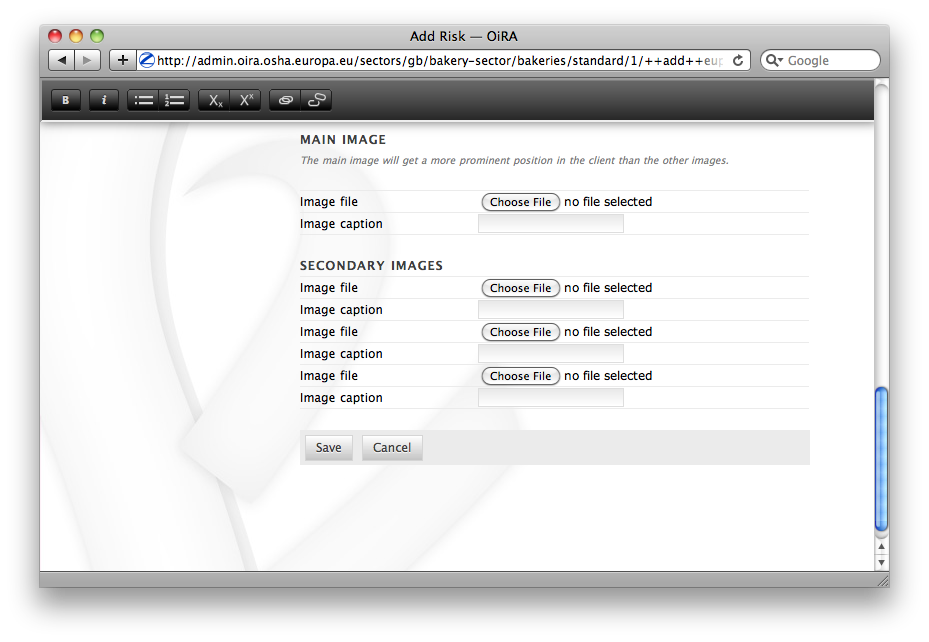
- Main Image and Secondary Images:
On the risk page you can add images. One Main image, which will appear on a prominent position and up to three secondary images, which will appear below. You should use these images to help describe the risk situation and eventually also the correct situation as a contrast.
You will have to upload these images yourself. Make sure that the images are clear and legible, not too large in surface size (maximum 300 x 300 pixels on the screen) and file size (maximum 100 kB). Give the image a clear file name, without spaces (for example: Danger_logo.jpg). When the image is ready to upload, you select it from your computer by using the ‘Browse’ button. The location and file name will appear in the field.
This function will only allow you to upload images with a ‘gif’ or ‘jpeg’ extension. Any other files will first have to be placed onto a website and can be linked to from the text.
After uploading the image, click on ‘Save’ (at the bottom of the page).
You can modify the risks at a later stage by using the ‘Edit’ button. With the Action menu (top right) you can cut, copy and delete modules and by dragging them (up or down) you can change the sequence. You should do this before the OiRA tool has been published.
Formulating risks (positive statements)
The risks have the form of statements. Avoid words such as not / no / never in the statement (and also in profile questions). Given that the end-user can only answer with ‘Yes’ or ‘No’, a statement containing the word ‘not’ and the answer ‘No’ can lead to confusion. Reformulate for instance as follows:
There are no obstacles or trailing cables on the floors->
Floors are free from obstacles or trailing cablesWhen reformulation is not a possibility, try to clarify with an explanation what will happen when the end-user answers with ‘No’, e.g.: ‘By answering ‘No’, there is a risk, when answering ‘Yes’, there is no risk’.
For all statements, the answer ‘No’ always indicates that there’s a risk and the answer ‘Yes’ indicates there isn’t a risk.
Any answers other than ‘Yes’ and ‘No’ are not possible, except for temporarily skipping the risk (‘parking’ it by not answering it) during the OiRA tool (when the end-user doesn’t know the answer immediately). In addition it’s possible to offer the option ‘Not Applicable’, if necessary (see below for the procedure). This is useful for risks of which you can’t predict whether they will be relevant to the end-user. Using the optional (filter) modules should however, to a large extent, avoid the end-user being presented with irrelevant risks.
Specify evaluation method
Chose one of these types:
- risk: refers to the existing risks at the workplace or linked to the work carried out. To identify and evaluate such risks it is often necessary to examine the workplace (to walk around the workplace and look at what could cause harm; consult workers, …).
- policy: refers to agreements, procedures, management decisions regarding OSH issues. These issues can be answered behind a desk (no need to examine the workplace). They are not evaluated by the end-users (in the evaluation step).
- top 5 risk: refers to a risk considered by the sector/authorities among the top 5 in the sector. “Top 5 risks” are considered by default as “high priority”, so end-users are not asked to evaluate them.
Risk
This handles risks other than the commonly known Top 5 risks which are typical for the sector. It concerns the risks which can occur inside the working area or during a working procedure. At this stage of creating the tool it isn’t clear how high the risk is. You can ask the end-user to specify how high the risk is in two ways:
- Calculated:
If you choose the CALCULATED method, the system will automatically calculate the priority depending on what you ticked in the probability, frequency and severity fields (based on the Kinney method). Chose wether to provide a pre-calculated risk (that will appear to the end-user in the evaluation step), or to leave the “no default” options (this means that you don’t want to orientate the end-user in the evaluation step). Anyway, the end-user is always free to overrule your presets.
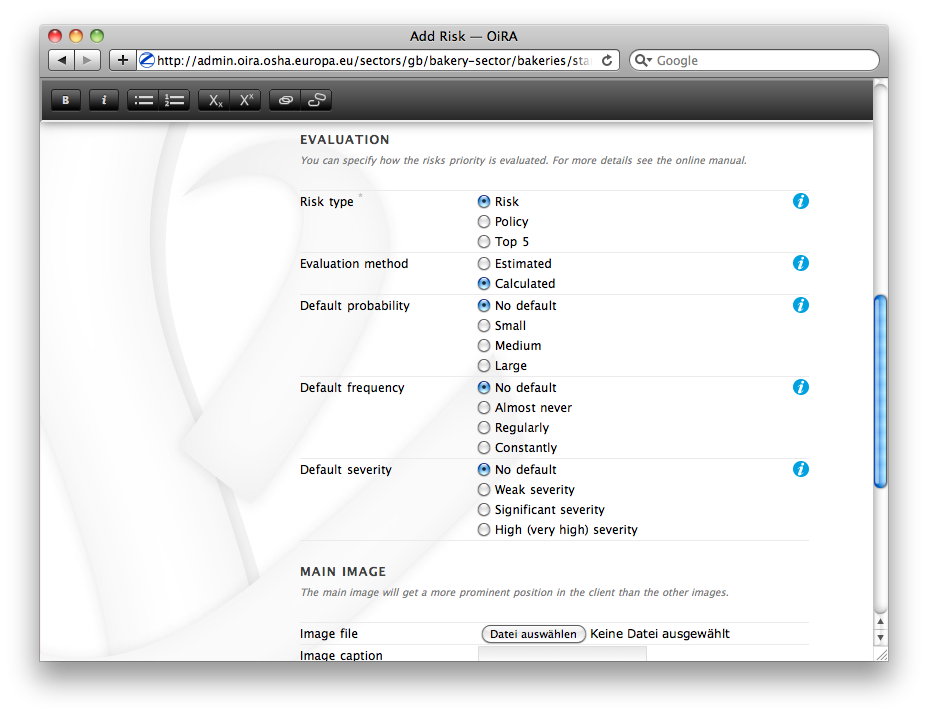
The questions for probability - frequency - severity are:
How high is the probability that this risk will occur?
- Small
- Medium
- Large
How often is one exposed to this risk?
- Almost never
- Regularly
- Constantly
What is the severity?
- Weak severity
- Significant severity
- High (very high) severity
The program then calculates the level of the risk and it’s priority in relation to the answers.
You can help the end-user by pre-selecting the probability / frequency / severity options, according to your sector. The end-user will then be shown these options and can adapt them, if required. If you’re unsure, or if you want the end-user to evaluate this individually, add ‘No default’. The end-user will then see ‘blank’ bullet points in the evaluation.
- Estimated
Select ‘Estimated’ when a calculation isn’t necessary or possible.
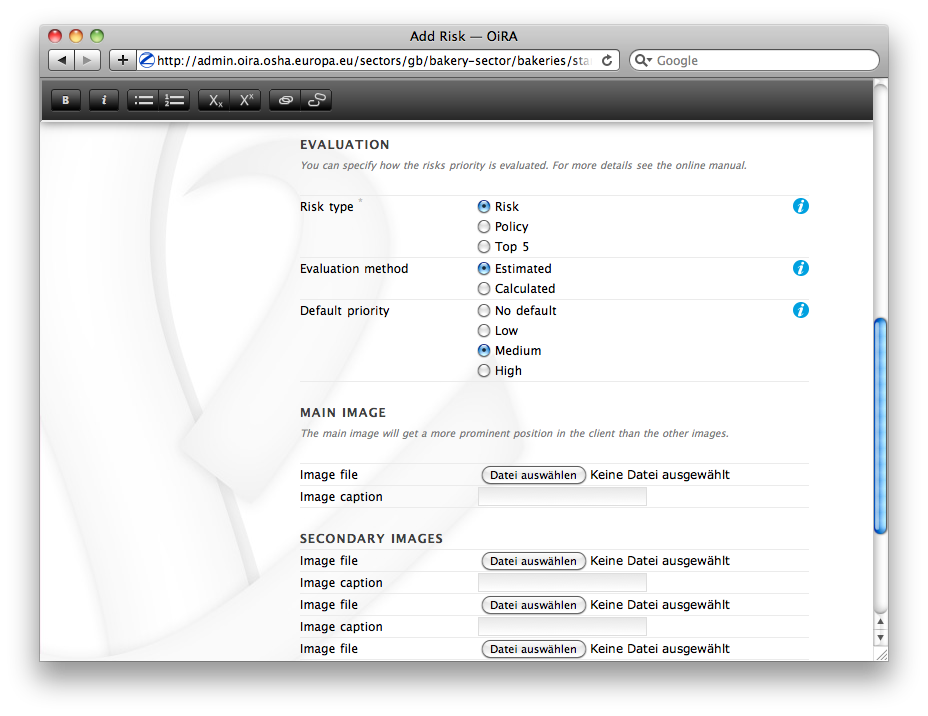
Select the default priority by choosing wether to provide a rough estimation of the risk (high, medium or low that will appear to the end-user in the evaluation step) or to leave the “no default” option (this means that you don’t give directions to the end-user in the evaluation step). Anyway, the end-user is always free to overrule your estimation.
Policy risk
This concerns a question about policies (e.g. employment policy) or procedures (e.g. acquisition). The end-user isn’t asked to specify a priority here. When ‘Policy risk’ is selected, this doesn’t have to be added to the evaluation but will be referred to again in the Plan of Action.
Top 5 risk
A top 5 risk is determined by the sector and is a high risk by definition. Here too, the end-user won’t be asked to prioritise and it will be incorporated into the Plan of Action with a high priority.
Solutions / measures
One of the goals of this tool is to help users with information on how to solve problems they encounter during the process. This is done by providing typical solutions to general problem areas (by module) or specific problems (by risk). Therefore you can add such solution information in a module and attach it to a risk.
It is most comfortable for the end-user if you provide a solution for each risk, because then the user will be able to pick solutions with a click to prepopulate the action plan form.
In some cases it might however be not possible to provide that specific solution information. Then you should at least specify an ‘Overview of solution’ on the module. This text should contain an approach for the user how to tackle the risks described in that module in a general way. This information will be displayed in the Action plan before each specific risk is handled.
You can add the “Overview of solution” in the module edit form.
- When you don’t work with solutions per risk, it is important that you give an “Overview of solution”
- If you do work with solutions per risk, it is optional
Solutions/measures - per risk
In addition to an ‘Overview of solution’ per module level, it is recommended that you create solutions for all risks. You can do this as follows:
A solution is related to a concrete risk. First select the risk in the correct module and then click on ‘Add Measure’ in the grey bar.
You will see a new screen with blank fields:

- Description:
- Start with words which reflect the core message of the measure, for example: ‘Information and Instruction’, and then offer the rest of the solution. This text helps to get the end-user started and explains the possibilities. In this field you can format the text and include links to documents or websites. If you would like to include an image, you can do this at the risk itself. This description text will not be incorporated into the Plan of Action.
- General approach (to eliminate or reduce the risk):
- Describe what is your general approach to eliminate or (if the risk is not avoidable) reduce the risk. This text will be incorporated into the Plan of Action. For example: ‘Ensure the correct means of Personal Protection are used, according to...’. If the end-user selects this measure it will be copied over to the Plan of Action.
- Specific action(s) required to implement this approach:
- Describe the specific action(s) required to implement this approach (to eliminate or to reduce the risk). For example: ‘Purchase a new machine which produces less noise/dust’.
- Level of expertise and/or requirements needed:
- Describe the level of expertise needed to implement the measure, for instance “common sense (no OSH knowledge required)”, “no specific OSH expertise, but minimum OSH knowledge or training and/or consultation of OSH guidance required”, or “OSH expert”. You can also describe here any other additional requirement (if any). For example: Budgeting, Rraining for Prevention/Safety staff, incorporating this subject in team meetings, etc.
If the end-user selects this measure it will be copied over to the Action plan. End users can also rework the text.
If the end-user selects this measure it will be copied over to the Plan of Action.
Click on ‘Save’ at the bottom of the page.
You can add more standard measures for each risk if needed, by clicking on the button ‘Add Measure’.
Checking your OiRA tool
When all the work has been done, i.e. the structure, contents and profile have been completed, you can view your OiRA tool (prior to making it public).
This is done by clicking ‘Preview’ in the ‘Versions drawer’. The online program with your (unpublished) OiRA tool will be shown in a new window.
To view the preview you will have to register to the OiRA tool front-end, the end-user will have to undertake the same action when starting the OiRA tool. After registering, you can complete the OiRA tool as an end-user.
Tip
check as many boxes as possible in the profile, answer the filter questions with ‘Yes’ and the risks with ‘No’. This way you will view all risks and possibilities.
When you discover faults in the preview you can amend these in the OiRA tools generator. Access the Preview again to check your modifications.
Note
The preview is stored in a separate place on the server, it won’t be viewable to the end-users until you publish the OiRA tool.
Implementing your company logo and design into the OiRA tool(s)
Straight after logging into the OiRA tools generator, you go to the ‘Settings’ menu (top right).
You will see the following screen:
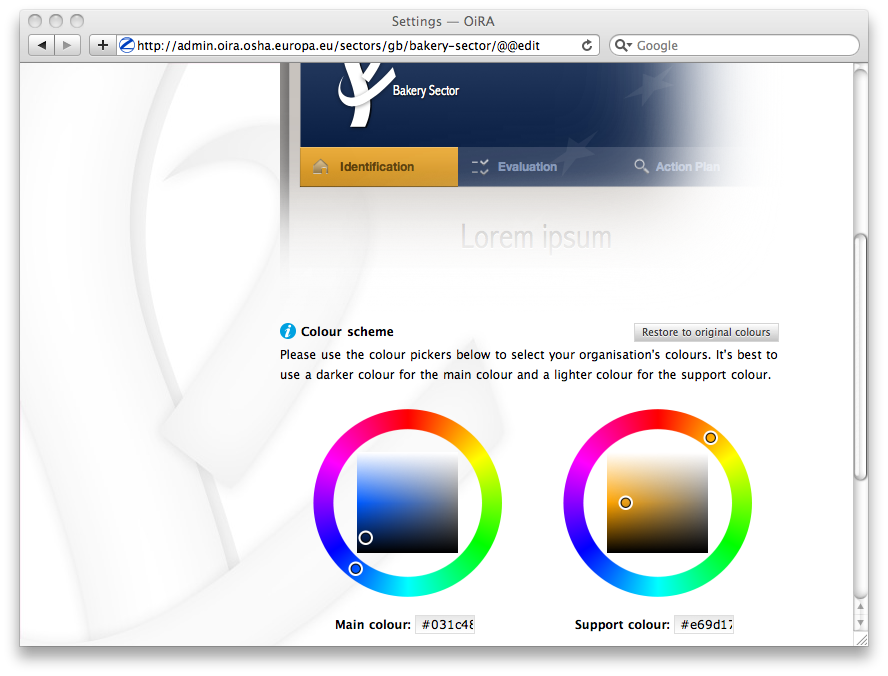
Here you can select the two most important colours: a main colour and a supporting colour. You can do this by clicking on the white circle (don’t let go of it!) and dragging this to the colour of your choice. You will immediately see the effect on the logo at the top.
You can also enter the colour code into the Hex-field underneath.
Note
It’s recommended to let a designer determine the colours, who can ensure amongst other things that:
- Appearance is clearly identifiable with the sector.
- Legibility of the text (the OiRA tool end-user will often have to read large portions of text).
- Forms of colour blindness (at 10% of the male population) are taken into account.
The design changes are made to the sector, so they will apply to all OiRA tools created within that sector.
Logo
One sector logo can be placed at the top left of the program. If you want to include several logos, you will have to amalgamate these into one image.
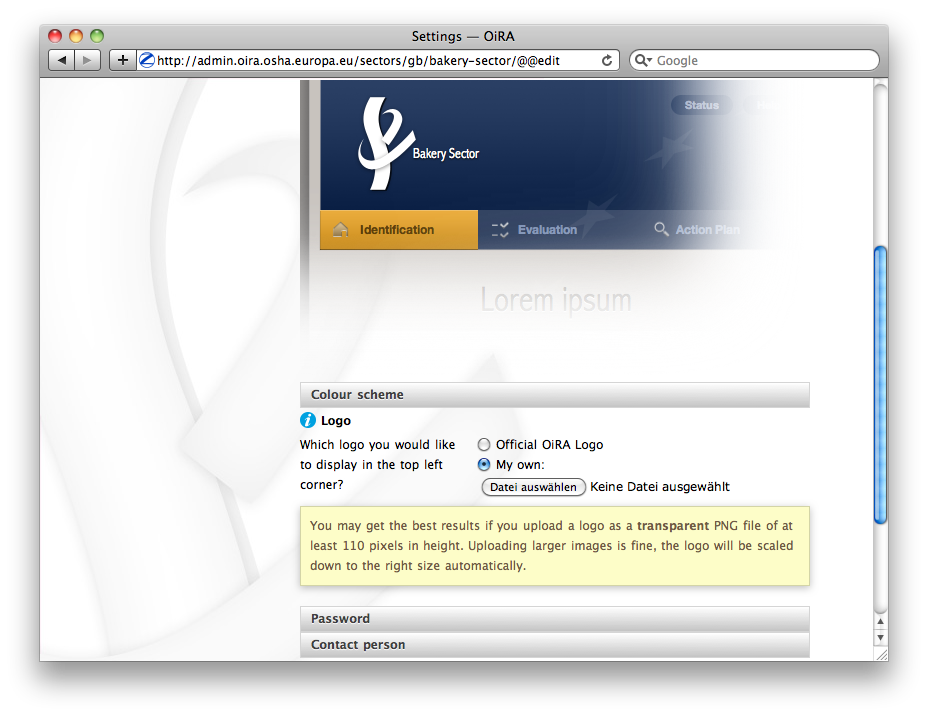
For best results, take a transparent ‘PNG’ file with a height of at least 110 pixels. Larger logos will be resized automatically.
Place the logo at your sector as follows:
Under ‘Logo’ you check the box ‘My logo’, you then click on ‘Browse’ next to ‘Choose file’ to navigate to your own computer. To upload the image and link it to your own OiRA tool, click on –> ‘Save’ at the bottom of the page. You can change the image at a later date if need be, or opt for the standard logo.
Ready? Publish!
Once you’ve successfully completed all steps it’s time to publish your OiRA tool.
When you click on ‘Publish’, the OiRA tool will be made available.
Note
It can take some time to perform this action.
A confirmation will appear in a green bar:

From now on, the public can view and complete your OiRA tool. If it’s a new OiRA tool we would like to be notified (oira@osha.europa.eu), and will put the link onto our site: www.oiraproject.eu. You don’t have to notify us when you’ve updated the OiRA tool.
Modifying an existing OiRA tool
The chapters prior to this are based on creating a new OiRA tool, potentially on the basis of an existing OiRA tool.
Naturally the process of creating an OiRA tool will be followed by managing and maintaining your OiRA tool. In actuality, the exact same considerations, focus points and functionalities apply to this process.
After adapting the OiRA tool you check it with the Preview and then publish it, as described above.
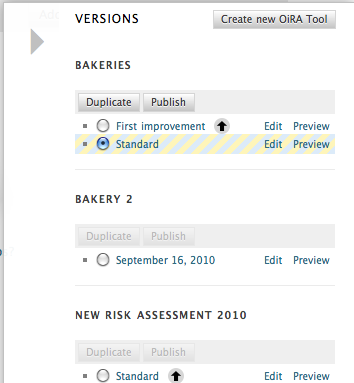
OiRA tool versions
The risk assessment tool allows you to store several versions of your OiRA tool and manage these versions. You can manage OiRA tool versions using the Version drawer on the right side of the browser window. It is hidden by default and appears when you hover your mouse over the grey triangle.
A OiRA tool should be revised periodically, usually to adapt it to the latest changes in legislation or other environmental changes. This is supported through versions of a OiRA tool, so that you can keep your old versions while you only publish the one that is most up to date. Updating an existing OiRA tool version usually means to only do minimal changes to adapt it to latest amendments in legislation or new findings. In this case you don’t want to create a new OiRA tool version but instead copy the old one and make amendments.
- Mark a OiRA tool version
- Click the Add version button.
- Provide a Title
- Make sure the correct base revision is selected
- Click the Create button.
Now you have a second OiRA tool version available and you can work on this one. Once you are done, you can publish it and it will replace the existing OiRA tool.
Where can you ask questions?
Direct your questions to:
Online Interactive Risk Assessment, EU-OSHA at oira@osha.europa.eu
We wish you all the best with creating your digital OiRA tool.
The EU-OSHA OiRA Team